
Register a SNAP EBT card with Amazon
Foiling the AI
One of the best things about SMG is the strong AI. If it cheats it disguises it well. It will challenge you to find sound tactics rather than a way around AI cheats.
AI Strengths
When playing the AI you must keep a careful eye on every regiment near the shooting. If you're not careful (particularly when playing the Union) you'll have regiments routing that were in good condition just moments before. The AI is very good at finding vulnerable units and ganging up on them. It's looking to cause a rout in order to punch a hole in your line and damage the morale of any nearby units. Keep in mind that when one of your units routs, all nearby units gain a block of stress. This can lead to a crumbling line.
So far, I've found 3 conditions that lend themselves to getting a regiment picked on. The last two present the opportunity for flanking fire which is why the AI pursues them.
It has no cover. In that case look out for concentrated artillery fire.
There's a gap (it doesn't have to be large) on one or both sides
of it.
If this is the case, fill the gap as soon as possible. I've found
that the fastest way to accomplish this is to let the beleagured unit fall
back while advancing reserves to alongside it.
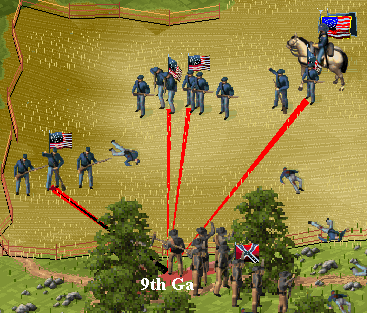
It's at the head of a salient, i.e., on the corner of a bent-back line. That's the case in the screen shot above.
Here are four corner formations in worst to best order:
 |
This is the worst sort of corner formation. There are two exposed flanks on the northeast corner. The AI will seek them out, pile on the fire and try to force an opening here. |
 |
The unit facing east has covered its corner flank. The other unit is still exposed however. This is the sort of formation the units in the screen shot above have. |
 |
A unit has been placed into the corner at a 45 degree angle. No one will get a full flanking shot on any your units. However, they can still get flanking fire of a lesser degree on all three. |
 |
This is the best corner formation that I've discovered so far. Inevitably, I find that I must pull back the corner unit (the one facing northeast). In that case, I have a reserve to push forward. All things being equal, by the time the reserve regiment wears out, the attack probably will have worn out as well. |
| You've no doubt noticed that as the formations get better the number of units increases. Keep in mind that it's likely that you will have access to those extra units. In order to gang up on that corner the AI will have to pull troops from other areas. That means you can pull your own troops from other areas. | |
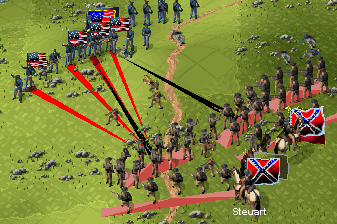
The following set of screen shots is a good illustration of this method.
The regiment at left is being fired on by 4 Federal units. The regiment in the middle has someone to shoot at, but it would do better to draw away some of the fire on the left. The regiment on the right isn't even in range. It needs to advance regardless.
The unfired-upon regiments advance. Note that the center regiment has
been given the Don't Stop command and has a green movement arrow. This
regiment will have to be given a Halt order to stop.
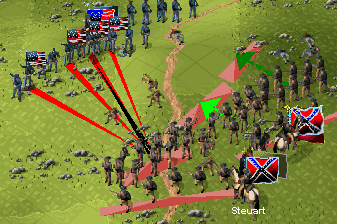
The middle regiment draws fire from two sets of Federals. It stops
and returns fire. The right regiment is now in firing range.
It could be advanced more to draw fire, but in this case I don't think
that's necessary.

Less than 50 yards - 150% normal fire effectiveness 50 to 100 yards - Normal fire effectiveness 100 to 150 yards - 50% normal fire effectiveness
We've all had this experience before. A scenario is getting under way. You send a brigade off through the woods on a long march. You then go to another part of the map to deal with other matters. Suddenly you hear, "retreat!" You might even hear it two or three times in succession. You scroll back to the brigade to discover that several enemy regiments have popped out of the woods to deliver a surprise volley on your men.
The AI is very good at ambushes. Veteran and crack units aren't as susceptible to them. When the first volley is received they will probably keep their cool, form a line and start returning fire. However, green and trained units will often run when ambushed (Union players beware). Here are some ways to avoid getting ambushed.
Keep an eye on your enemy. For example, if you saw an enemy brigade
marching around a moment ago, but they've suddenly disappeared, be wary
of the path in front of where you last saw them. They may still be
moving, but are obscured by a fold in the hills. However, they also
may have stopped and are waiting for you to wander by. Before moving
troops there, have a commander take a look first.
AI Weaknesses
Using Cover
The AI does not place a lot of value on cover. This can be particularly exploited if you're on the defensive and/or you have good ground for artillery. The screen shot above (under Concentrating Fire) is actually a good example of this. A couple of those Federal regiments are under artillery fire because they're out in the open. Meanwhile, my defending regiments and batteries are in the woods and, therefore, safe from artillery.
A good example of the AI's lack of respect for cover can be seen in Slocums Counterattack: Spangler's Spring. Play as the Rebels and place several batteries on top of the Spangler's Knob VP site. Also make a tight east-west infantry line at the edge of the woods. Every time I've played this scenario the AI has tried to charge uphill through the open ground south of the Knob. It always takes a lot casualties and has never broken through. I've tried three different AI personalities including aggressive/indirect. It's never veered from this tactic.
Keeping Reserves
This normally applies to scenarios where the AI is on the offensive. If that's the case and you punch a hole in its line or find an exposed flank you'll often be in a good position to press the advantage. The AI probably won't have anything readily available to meet your threat.
If the AI is defending a VP site, on the other hand, it probably placed a brigade or regiment on top of it early on. It will use these troops as reserves. At least you have an idea where the reserves will come from.
Becoming Distracted by Skirmishers
The AI puts a high priority on chasing away skirmishers. I've
seen AI regiments charge skirmishers at the expense of occupying a VP site.
For more information on using skirmishers against the AI see the end of
the article on cavalry
and skirmishing infantry.
